A Wicked Scoff...Recipes and Food with Newfoundland and New England Influences.

This blog is dedicated to bring recipes, photographs, anecdotes, reviews and other insights on everything food related. As the name suggests, "A Wicked Scoff" will have a regional flare, a fusion if you will, of both Newfoundland and New England perspectives of the culinary world around me. Thanks for visiting and please come back often as updates will be frequent. Oh yeah, I also like tasting and cooking with regional beers. Expect a beer of the month, often paired with recipes.

Wednesday, July 7, 2010

Brined/Grilled Pork Chop with Grilled Onions and Spicy BBQ Sauce

Chowing down on grilled pork chops with a sticky, finger-lickin BBQ sauce is one of the finest things about summer. Growing up in out around the bay in rural Newfoundland, having a BBQ, 90 percent of the time meant having grilled pork chops covered in Kraft BBQ sauce. There was nothing fancy about them, they were usually a  frozen variety pack of chop cuts, quite often a fairly thin bone-in sirloin. Donlt get me wrong, I still love those chops, but now when I go to relive my youthful memories of BBQ pork chops, I go at it a little differently.

First of all, my preferred cut of chop is a thick-cut rib chop. This is similar to the pork line chop but has a little T-Bone in it and contains mostly center loin along with a bit of tenderloin...just line a T-Bone steak would. This is a lean cut of pork, so that' why I like to go thick, it won;t dry out as easy. A key is to not cook it to death. Pink in the center with clear juices or 160 degrees is as far as you want to take these puppies. An instant read thermometer will be your best friend.

Another way to insert flavor, seasoning and juiciness through the meat is to brine it. A simple saline solution bath of water, salt and a little apple cider and apple cider vinegar for a few hours will do the trick. Other ways to enhance the seasoning will be to give the chops a dusting with a spice rub before putting on the grill.

The last key to a better chop is to slather it with a homemade BBQ sauce. I mix up the ingredient combination of my BBQ sauces all the time, but they always start out with ketchup, apple cider vinegar, molasses and dry mustard. I usually also add some of whatever dry rub I am using and varying degrees of sweet, sour, savory and heat.


Brined and Grilled Rib-Chops

Ingredients:

4, 8-10 ounce, thick cut rib or center cut pork chops

1 qt of water
1/4 cup of salt
1/4 cup of apple cider (or apple juice)
1 TBSP Worcestershire sauce
2 TBSP of dry rub


Directions:

Mix the wet ingredients to dissolve the salt. Place pork chops in a large ziplock bag, pour in the brine, and let the pork chops swim in the brine for at least 4 hours, but 12-24 hours will be best.

When ready to cook, preheat a gas or charcoal grill and oil the cooking surface with vegetable oil. Pat the chops dry with paper towels and season with a little of the dry rub. Place chops at an angle on the grill so you can give them a quarter turn to get those nice chop house grill marks. I'm not great with cooking times. I go by feel and eye mostly, and I use an instant read thermometer when I am unsure. You'll want to cook the chops to slightly pink, with clear juices. An overcooked pork chop will be tough. The brine process will give you a little forgiveness. For chops of this size I would cook them for about 12-14 minutes and a 5 minute rest time on a warm, covered plate. So, after 3 minutes I would turn for grill marks, at 6 minutes I would flip, at 9 minutes I would quarter turn, apply a brushing of BBQ sauce and at 12 minutes I would  re-flip to apply sauce to side A, and remove from the grill to let rest.

Pork Dry Rub

Ingredients:

1/2 cup of kosher salt
1/4 cup brown sugar
1 TBSP of each of the following:
- garlic powder
- onion powder
- paprika
- chili powder
- allspice
- black pepper
- dry mustard
1 tsp of cayenne pepper

Directions:
Combine salt, sugar and spices well, and store in an air tight container in a cool dry place. Will last for ages.

Pork Chop BBQ Sauce

Ingredients:
2 Cups ketchup
1/2 cup apple cider vinegar
1/2 cup molasses
1 tsp dry mustard
2 TBSP dry rub spice
1 TBSP allspice
dash of Tabasco sauce


Directions:

Combine all ingredients in a small sauce pan. Cook over a medium heat and whisk together. Bring to a simmer, and reduce to low. Cook for 10-15 minutes and reserve for chops and onions. Store in the refrigerator after use.

Grilled Onions

Ingredients:

1-2 Large Vidalia, or other sweet onion, sliced into rounds
Vegetable Oil
Dry Rub Spice
BBQ Sauce

Directions:

Keep the onion slices together (i.e. do not separate as if making onion rings) and coat with a little oil and season with the dry rub spice. Place on a hot grill. Cook for 3-4 minutes until they begin to char and carefully turn with a spatula. Cook until limp and brush with BBQ sauce. Turn again and brush the other side with BBQ sauce. Serve while hot along side grilled pork chops.

Friday, June 25, 2010

Broiled Salmon Fillet with lemon and dill

I really can't eat enough seafood, especially when it's super fresh! One of my favorite things to eat is Atlantic salmon. Here is a quick, super simple way to prepare whole salmon fillets, a recipe that works just as well with smaller fillet portions or steaks, or pretty much any seafood for that matter.

Simple seasoning of kosher salt and fresh cracked black pepper, a drizzle of olive oil and some fresh herbs from the garden such as dill or chives, and a good squeeze of fresh lemon once cooked, is all you need to be a master salmon chef. The key is not to overcook it. While salmon is pretty forgiving when it does come to being overcook, because of its fat content (healthy Omega-3 fats), it is exceptionally good when cooked just to the point of doneness.Many people actually prefer a touch of rawness in the center.When I cook my salmon, either by grill, broiler or frying, my goal is to cook it just to the point where the rawness in the center is down to a sliver or has just disappeared. Whatever method, I make sure the heat source is pretty hot. Depending on the thickness, I typically cook it about 4 minutes on side A and 3 minutes or less on side B, starting skin side down. I also love to get the skin crispy as it is quite tasty. Then I let it rest for a couple of minutes and when it hits the plate it is super juicy!

Monday, June 7, 2010

Say hello to my little frineds! SLIDERS

Invented by the American hamburger fast food chain White Castle, and now a restaurant phenomenon everywhere, sliders are quite simply mini-burgers. Smaller buns, smaller patty, smaller amount of toppings equaling huge flavor and huge fun.

Just as with hamburgers/cheeseburgers, the variety of sliders that can be made and enjoyed is endless. The key to making a great slider is simple. Choose small, soft rolls and stuff them with a juicy, well season, non overcooked burger. I have found that I am beginning to find "slider rolls" labeled as such at the grocery store, but if you can not find the, small soft white dinner rolls are a good option. in my neck of the woods, I prefer Martins Potato Rolls "for Sliders".

This past weekend we had company I wanted to make a dinner that was casual, could be made on the grill, and would be tasty! I've been enjoying using my meat grinding attachment on my stand mixer and I had some nice sirloin steaks that I thought would make good slider meat. Sirloin is leaner then chuck (90% as opposed to 80%), so I was conscious to only cook the sirloin sliders to medium/medium well, or pink as they say at some burger joints in order to retain the juiciness I was looking for. Chuck is probably the best meat to use for burgers, especially if you want it to be cooked all the way through and don;t mind the extra calories or fat.

My goal was to make a trio of sliders. For inspiration I drew on a couple of classics, in addition to using some more of my "Newfie screech coffee spice rub". What I came up with was a bacon cheeseburger slider, topped with sharp Vermont cheddar cheese, fried onions, ketchup, yellow mustard and dill pickle; a green chili sliders, topped with canned green chili's (diced and sauteed with fresh jalapeno, garlic and cilantro) and pepper jack cheese; and finally, a Newfie Screech coffee slider equipped with a drop of steak sauce and sauteed mushrooms deglazed with a drop of dark rum
 For my slider meal, I made 12 sliders out of a little more than 2 pounds of freshly ground sirloin. Each patty was about 3 ounces. For burgers I typically do not season the meat until I have formed the pattys, and usually I only add salt and pepper. I like to let the condiments and toppings bring the extra flavors. This is what I did for my sliders, with the exception of the the third slider, which received a liberal coating of the Newfie Screech coffee-spice rub on each side. For cooking the sliders, either pan fry them or cook them on a hot grill until desired doneness. As I said, for a leaner meat like sirloin (or if you are using buffalo or moose, etc) it's best to not cook past medium-well, while the fattier ground chuck will be more forgiving. I usually season the burgers, grill on the first side for about 4 minutes, flip, add the grated cheese and close the lid. By the time the cheese melts I remove the meat so that it can rest for a couple of minutes while I toast by buns. Then I assemble the works and dig in.

Saturday, June 5, 2010

The New Newfie Steak!

For me, and for many readers of this blog, the term "Newfie Steak" conjures up images of thickly sliced, fried bologna (with Maple Leaf brand bologna being the fillet of choice for bologna connoisseurs!). I use food as a creative outlet and I'm always thinking of ways to put a new and interesting spin on Newfoundland and New England classics. Recently while looking for a way to cook with Newfoundland Screech Rum, I came across a recipe for a dark rum sauce for steak. I adapted it slightly to make it my own and made it for guests with a seared fillet of beef. It was delicious, and you wouldn't even believe there was a 1/4 cup of rum in the sauce.

The remaining inspiration for this recipe came from watching a television show about steak houses which reminded me of a coffee-rubbed steak I once had. A light bulb went off - what a great way to utilize my Screech flavored coffee beans! I developed a coffee spice blend for the rub and tried it on some locally raised, thick cut rib-eye steaks, and I was in heaven. The spice rub provided a very satisfying crust on the seared meat, and the coffee flavor was both interesting and tasty. If you cannot find Screech coffee beans, I'm sure regular, high quality coffee will be delicious. However you will miss the undertones the rum bring to the rub. I order my Screech coffee from a Newfoundland business...Jumping Bean Coffee Company. Check out their website (http://www.jumpingbean.ca/default.asp).

Screech Coffee Spice Rub

Combine the following and keep stored in an airtight container. The rub will last for a long time and will make many steaks.


  • 1/4 cup Screech flavored coffee beans, ground very fine (use regular coffee if you can not get Screech flavored coffee beans.)
  • 1 TBSP - ancho chili powder
  • 1 TBSP - chili powder
  • 2 TBSP - paprika
  • 1 TBSP - onion powder
  • 1 TBSP - garlic powder
  • 2 TBSP - brown sugar
  • 1 tsp - salt
  • 1 tsp - black pepper
  • 1/4 tsp - cayenne pepper
  • 1/2 tsp - summer savory
  • 1 tsp - dry mustard
  • 1 TBSP - Montreal Steak Spice


Coffee Spice Rubbed Steak (2 servings)

  • 2 thick-cut, boneless rib-eye steaks

Pat each side of the steaks with a liberal amount of the spice rub.

In a large stainless steel or cast iron fry pan, heat:

  • 2 TBSP of vegetable oil over medium high heat.

Once the oil wofts smoke, gently lay each steak into the pan. Do not touch the steak for at least about 4 minutes as you want a crust to form. The steak will release once it is ready. After 3-4 minutes, it will have a nice crust and then you can flip it with tongs. I cook mine for 4 minutes on the first side 3 minutes on the second side, and then I let in rest, covered loosely with foil in a warm oven for another 5-10 minutes which usually yields a medium rare on a 1 inch thick steak such as this.

Dark Rum and Mushroom Steak Sauce (for 2 servings, but can easily be doubled)

Cook the mushroom sauce in the same pan that your seared the steak in. The browned bits at the bottom of the pan will add tremendous flavor to the sauce. If there is not enough fat/oil in the pan, add a little more so that you have about 2 TBSP worth, and set heat to medium high.


To the pan, add:

  • 1/2 pound of mushrooms, sliced (I like baby bella, but any mushroom would be fine)

Spread the mushrooms evenly and toss in the oil. Saute for 2-3 minutes. The mushrooms will absorb the oil, and then they will release their moisture and begin to brown nicely. Once they begin to brown, add:

  • 2 TBSP minced shallot
  • 1 clove garlic, minced
  • 1 chipotle pepper (in adobo sauce), minced (optional, but it will add a smoky heat!)

 Season with a touch of salt and pepper. Cook for a minute and deglaze the pan with:

  • 1/4 dark rum (such as Screech) and add:
  • 2 TBSP molasses
  •  2 cups of beef stock

Simmer for 2-3 minutes until the sauce reduces by half and add a small pat of butter. Add some fresh herbs such as parsley or chives, for a little color and fresh flavor. Spoon the sauce over the cooked steaks.

Wednesday, June 2, 2010

Penne in the Style of Sorrento with Grilled Peppers, Onions and Italian Sausage

Here is a nice twist on a a popular Italian dish, "sausage and peppers with penne". For this dish, penne pasta is usually tossed or served with sauteed Italian sausage and bell peppers, onions and garlic. What I often do however is grill my Italian sausage links (I prefer hot, but mild or sweet sausage would also work great), as well as my vegetables, which I served along side a penne tossed in a cheesed-up classic marinara sauce, that I call penne, in the style of Sorrento, after a gnocchi dish I had there!

First I'll start with a simple recipe for a basic marinara sauce, the mother of all Italian tomato sauces. With that being said, marinara is actually a "mother" sauce as it can be transformed into many other tomato based sauces with particular additions, such as meat, for a bolognasse, or cream, or into a pizza sauce or a vodka sauce, or as I will do, add fresh mozzarella and ricotta cheese to make a pink and cheesy tomato sauce.

Basic Marinara Sauce

In a sauce pan, heat over medium heat:
- 1/4 cup of olive oil 
Add, and saute until tender:
- 1 large onion, diced fine
- 1 carrot, diced fine
- 1 rib of celery, diced fine

Then add:
- 3-4 cloves of garlic, crushed
- 2 large (28 ounce) of good quality crushed tomatoes
- 2 Tbsp of dried Italian herbs (mix of oregano, thyme, marjoram and basil)
- 1tsp of salt and pepper.

Bring sauce to a low simmer and let cook, uncovered for at least 30 minutes. A little longer wouldn't hurt.


Penne in the Style of Sorrento (serves 4)

Cook 1 pound of penne pasta until it is al dente (still with bite).

While the pasta is cooking, ladle 4 cups of marinara into a deep saute pan. Bring to a low simmer and add:
- 1/2 cup ricotta cheese
- 1/2 cup of fresh mozzarella cheese, diced
- 1 tsp hot red pepper flakes (optional)
- 3-4 basil leaves, chopped
- 2 Tbsp of fresh Italian parsley, chopped (reserve some for garnish)

Add the hot pasta to the cheesy marinara sauce and garnish with freshly grated Parmesan cheese and parsley

 
 To complete the meal, grilled Italian sausages and vegetables couldn't be easier...or tastier.
Simply slice:
- 1 large red onion, red bell pepper and green bell pepper. Toss in a little olive oil and grill in a grilling basket over a medium flame until tender and carmalized. Add a pinch of salt and pepper while grilling.
At the same time of cooking the veggies, grill your Italian sausages. Turn frequently so all sides get scorched, and cook until the juices run clear.

Sunday, May 23, 2010

Braised Short Ribs

Here is a nice hearty supper, that is simply to prepare and ultra satisfying. While this is more of a winter meal, since its a rich, meaty slow cooked dish, it will be great anytime. Just make sure its not on a hot day as you'll need your stovetop on for 3+ hours. Alternatively this could be done on the counter in a slow cooker. The beef ribs are a very tough and fatty cut of meat (makes great salt meat in Newfoundland) and thus it need a long slow cooking time to break down and become melt in your mouth tender.Whatever method, the key to great beefy flavor is to give the short ribs a good sear on all sides before braising with sauteed vegetables in red wine and beef stock. Here is how I made my 'bistro" style braised short ribs, which I served with some rough mashed red potatoes and steamed artichokes.


Braised Beef Short Ribs (2 servings for a romantic Euro style date night)

In a large heavy bottom pot or preferably an enamel cast iron dutch over, heat over medium high heat:
- 1 Tbsp vegetable oil.
Liberally season 4 beef short ribs on all sides with kosher salt and freshly cracked pepper.

When the oil is hot place the ribs in the pot. Brown on all sides, turning with tongs every 1-2 mintues.

Reduce heat to medium, and remove ribs and reserve to the side.
Add:
- 1 medium onion, chopped
- 1 large carrot, chopped
- 1 large rib of celery, chopped
-6-8 white button or baby bella mushrooms, sliced

Saute the vegetables until translucent.
Toss in 6-8 cherry tomatoes or 1 tomato roughly chopped.
Add 2-3 cloves of garlic, chopped.

Cook for a minute or so and deglaze the pot (scrape with a wooden spoon) with 1 cup of red wine (whatever you have on hand - I had a bottle of Shiraz open from the night before) and 2 cups of beef stock. Return the ribs to the pot and add 2 Tbsp of Worcestershire Sauce and a shake of red pepper flakes (optional and to taste). Bring to a simmer and reduce heat to low (maintain the simmer). Cover and simmer for 2 1/2 hours. Partially remove the lid and turn on your overhead fan to reduce the sauce down. Continue to simmer, increase heat a little bit if necessary. When tender, serve on mashed potatoes and pour the vegetables and reduced sauce over the beef.

To make the potatoes, simple quarter 4 red potatoes (skin on) and boil in well salted water until tender. Add 1/2 cup of chicken stock and 2-3 Tbsp of butter, a pinch of salt and pepper and mash. Garnish with chopped parsley.

Wednesday, May 19, 2010

Braised Chicken Breast and Pasta

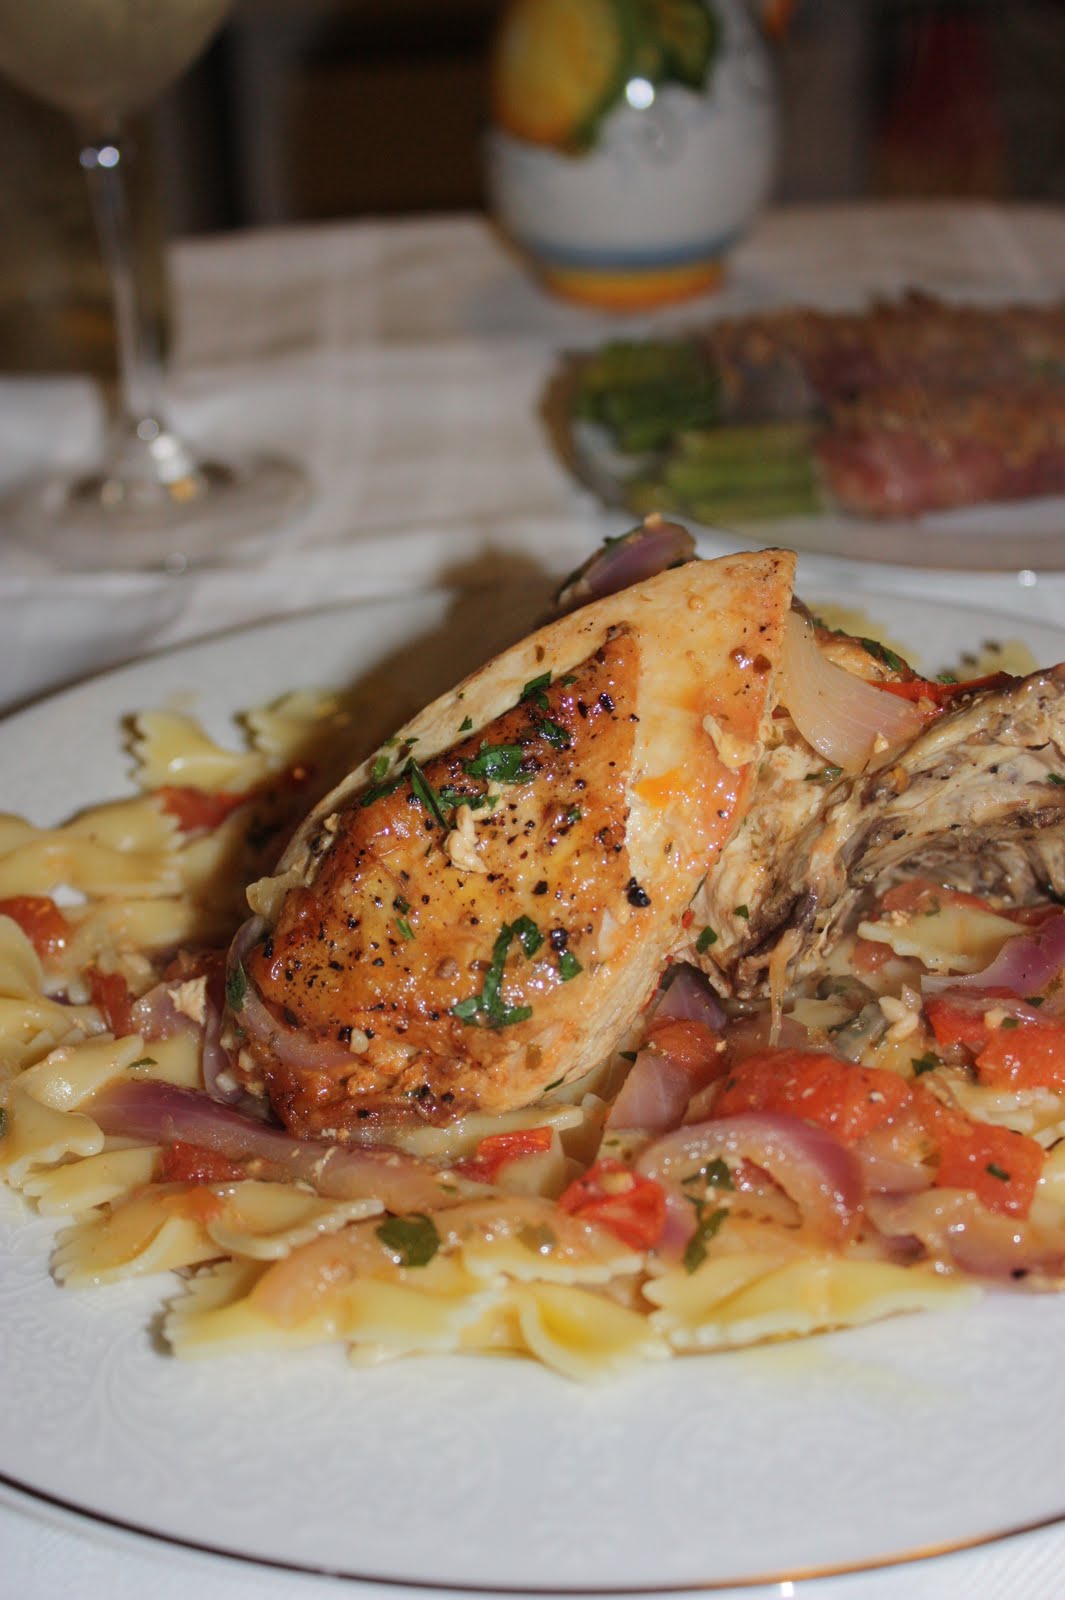
About a week ago I was still feeling Italian, and in the mood to create a hearty chicken and pasta meal using ingredients I had on hand in the fridge and pantry. This is what I came up with. I had bone-in skin-on chicken breast, and I thought browning them off, adding some aromatic vegetables and braising it all in white wine and chicken stock would be a good idea.  I served it on farfalle pasta with fresh herbs and grated Parmesan cheese.For a side dish I took advantage of the bounty of asparagus we have right now. I wrapped the blanched asparagus in thin prosciutto, topped with olive oil and breadcrumbs and browned them in a hot oven. Here is how I made the chicken pasta dish. I though it tasted great.

In a large dutch oven, heat on medium-high:
- 2 Tbsp olive oil

Add 4 bone-in skin-on chicken breasts (seasoned with salt and pepper) and brown on all sides.

While chicken is browning, thinly slice
- 1 red onion
- 1 red bell pepper
- 2 cloves of garlic

Once chicken is browned, remove from the pot, and add the sliced onion and peppers (add a little more oil if necessary) and saute until tender. Add garlic, 1 Tbsp of capers (rough chop) and return chicken to the pot. Deglaze the bottom of the pot with 1 cup of dry white wine and scrape all of the browned bits with a wooden spatula. Add 2 cups of chicken stock, 1 tsp of red pepper flakes and 1 Tbsp of dried Italian herbs.


Reduce to a simmer and cook uncovered (or partially covered) until chicken reaches internal temperature of 160 degrees (about 20-25 minutes). Sprinkle with freshly chopped Italian parsley and taste sauce for seasoning. Serve the chicken, vegetables and reduced wine/stock sauce over cooked pasta (I liked farfalle) and top with freshly grated Parmesan cheese and freshly cracked black pepper.

Blog Widget by LinkWithin