A Wicked Scoff...Recipes and Food with Newfoundland and New England Influences.

This blog is dedicated to bring recipes, photographs, anecdotes, reviews and other insights on everything food related. As the name suggests, "A Wicked Scoff" will have a regional flare, a fusion if you will, of both Newfoundland and New England perspectives of the culinary world around me. Thanks for visiting and please come back often as updates will be frequent. Oh yeah, I also like tasting and cooking with regional beers. Expect a beer of the month, often paired with recipes.

Monday, November 29, 2010

Scrod Roll-Ups with Mornay Sauce

What is a scrod roll-up you might ask? Before I answer that I should remind you what scrod is. Traditionally, the strict New England definition of scrod, was "a young cod, split down the back and backbone removed, except for a small portion of the tail". Although the word sounds an awful like like "cod", the origins of the word scrod probably comes from the Dutch word "scrood", piece cut off. So while purists will claim that true scrod is a small 1 to 2 pound cod, today, it has also come to mean haddock, as well as other white fleshed fish.

Now to the roll-up part. This recipe is inspired by a classic Newfoundland dish, and one of my favorites, cod au gratin. Which is basically pieces of cod baked in a creamy white sauce with cheese and topped with bread crumbs. A while back I was planning on cooking cod au gratin for my in-laws, however when  my wife's Uncle Jack returned from the market with some beautiful fresh fillets of scrod, I realized I had to make an adaptation as these fillets deserved to be left whole. While the package did not say if it was cod or haddock (although I am 99% sure it was haddock) the fillets were definitely from a small fish, and thus would be identified as scrod by any modern definition of the term.

With all the ingredients for cod au gratin on hand, and a craving for a rich, creamy and cheesy sauce, I made these scrod roll-ups, which are essentially baked scrod pinwheels with a Mornay sauce or "inside-out cod au gratin", whichever you prefer. The recipe is really very simple, and takes no time to pull together. Served with some roasted potato slices and sauteed spinach with a balsamic maple reduction, and it made for a satisfying and elegant entree. I hope you give it a try.

Baked Scrod Roll-ups with Mornay Sauce

Ingredients:

6 thin scrod fillets (alternatively you could butterfly 3 thick pieces of cod in half lengthwise)
2 cups bread crumbs (fine homemade work best)
1 tsp dried savory
salt and pepper
fresh dill (optional)
1/4 cup butter (plus extra to greasing the pan)
1/4 cup flour
2 cups milk (2% or whole)
1 cup sharp white cheddar cheese, grated

Directions:

Preheat oven to 350 degrees, and begin making the Mornay Sauce, which is nothing more than a standard white sauce (Bechamel) with the addition of cheese. Over a medium heat, melt the butter in a medium sauce pan, and add the flour. Make a roux by combining the flour and butter with a wooden spoon. Cook for a minute to "cook-out" the raw flour taste and begin adding the milk. Switch to a whisk and add the milk a bit at a time, stirring fairly frequently. Once you have added all the milk, it will take a couple of minutes for the sauce to reach the appropriate thickness. Add the cheese, stir and remove from the heat and set aside.

Grease a glass baking dish with a little butter and begin assembling your fish. Add the savory and a dash of salt and pepper to the breadcrumbs and lay your 6 fillets out on a work surface. Season each fillet with a little salt and pepper. Add a couple of tablespoons of the seasoned bread crumbs to the top of each fillet and spread evenly. Roll up each fillet in a tight little package and arrange in the baking dish. Top each roll-up with a some of the Mornay sauce and top each with the remaining bread crumbs. Reserve about half of the Mornay sauce finish the fish once it has cooked, and keep it warm on the side. If it gets too thick thin it out with a drop of milk. Cook the scrod roll-ups in the oven for about 15-20 minutes, until the flesh flakes.
Plate the cooked scrod roll ups, spoon some of the warm Mornay over the top and garnish with some fresh dill and a wedge of lemon.

Enjoy!

Wednesday, November 17, 2010

The All American Burger

Do you ever get a deep craving for red meat? I usually get one about once a week, especially if it's been 6 days since my last substantial meal of beef. It must be the carnivore in me. When I get these cravings, it sometimes leads to a nice thick steak, but most often it ends with a big juicy burger!

I've always been a burger fan, but I must admit that my infatuation with this all-American classic has reached new heights in recent years. While it might have something to do with the fact that I now live in the US, I think it has more to do with me watching TV shows like Diners, Drive-Ins and Dives, Man vs Food , and The Best Thing I Ever Ate. From  my "research" I have come to the conclusion that there are only a few ways to make a really great burger, and many ways to screw it up. While I have my favorites, what I wanted to share today is my version of a simple classic, the All-American Burger. It has just a couple of rules. Quality, freshly ground 80/20 chuck,  fresh, crisp toppings, a good roll, and reputable condiments.The last secret to deliver ultimate flavor and texture is to cook the burger on a flat top, and cook it pink, not well done. I use my trusty cast iron griddle (flat on one side and grill slots on the reverse) but you could use a cast iron skillet just as well. The key is to get a great sear on the burger as this will seal in the juices and give outstanding flavor. What makes this an All-American is that this is the type of burger you'll find all over the place at Mom & Pop drive-ins that are local institutions. All you need to go with a burger like this are some good hand-cut french fries and a cool, creamy milkshake!

The All American Burger (makes 4 half pound burgers)

Ingredients:
-2 lbs of fresh ground Angus chuck (80/20)
- 4 fresh, soft hamburger buns, toasted
- Fresh lettuce, tomato slices, and thinly sliced sweet onion
- pickle slices
- 4 slices of American cheese
- Heinz ketchup, good mustard, and other condiment of choice such as BBQ Sauce, steak sauce, etc.
- Kosher salt and freshly ground black pepper

Directions:
Over a medium-high flame, heat up you cast iron griddle or fry pan. Brush with a little vegetable oil.

Divide you ground beef into 4 equal portions and form into patties. Season each side liberally with salt and pepper. Lay the hamburger patties onto the hot griddle and let them get a good sear on for about 4-5 minutes. Gently turn the burgers and sear on the other side for about 4 minutes. Do not press on the burger with a spatula. This is a no-no. Once the burger is well seared on each side, top with a slice of cheese and place in a preheated oven until the cheese melts. Remove from heat and let rest for 3-4 minutes. This should give you a pink, but not bloody burger, which will give you the best beefy flavor. You may have to adjust the cooking time in the oven to suit your taste, or depending o how thick you form the burger. If you need to go longer, hold off on the cheese for a couple of minutes.

While the burgers are resting, toast your buns in the oven and arrange your toppings. The way I arrange mine are bun, lettuce, tomato, onion, pickle, burger, cheese and bun. Where are the condiments you may ask. Since I met my wife, I have copied her burger eating methods, and I think you should give it a try.

To eat your perfect burger, cut it in half and place your condiments of choice on your plate. With half a burger in one hand and a butter knife in the other. Before each bite, put a slather of condiment(s) in the area of the burger you are about to inhale. Eat some fries, take a slurp of milkshake, and repeat! There you have it, the ultimate burger!

Thursday, November 11, 2010

Moosewich Dip...a new use for bottled moose

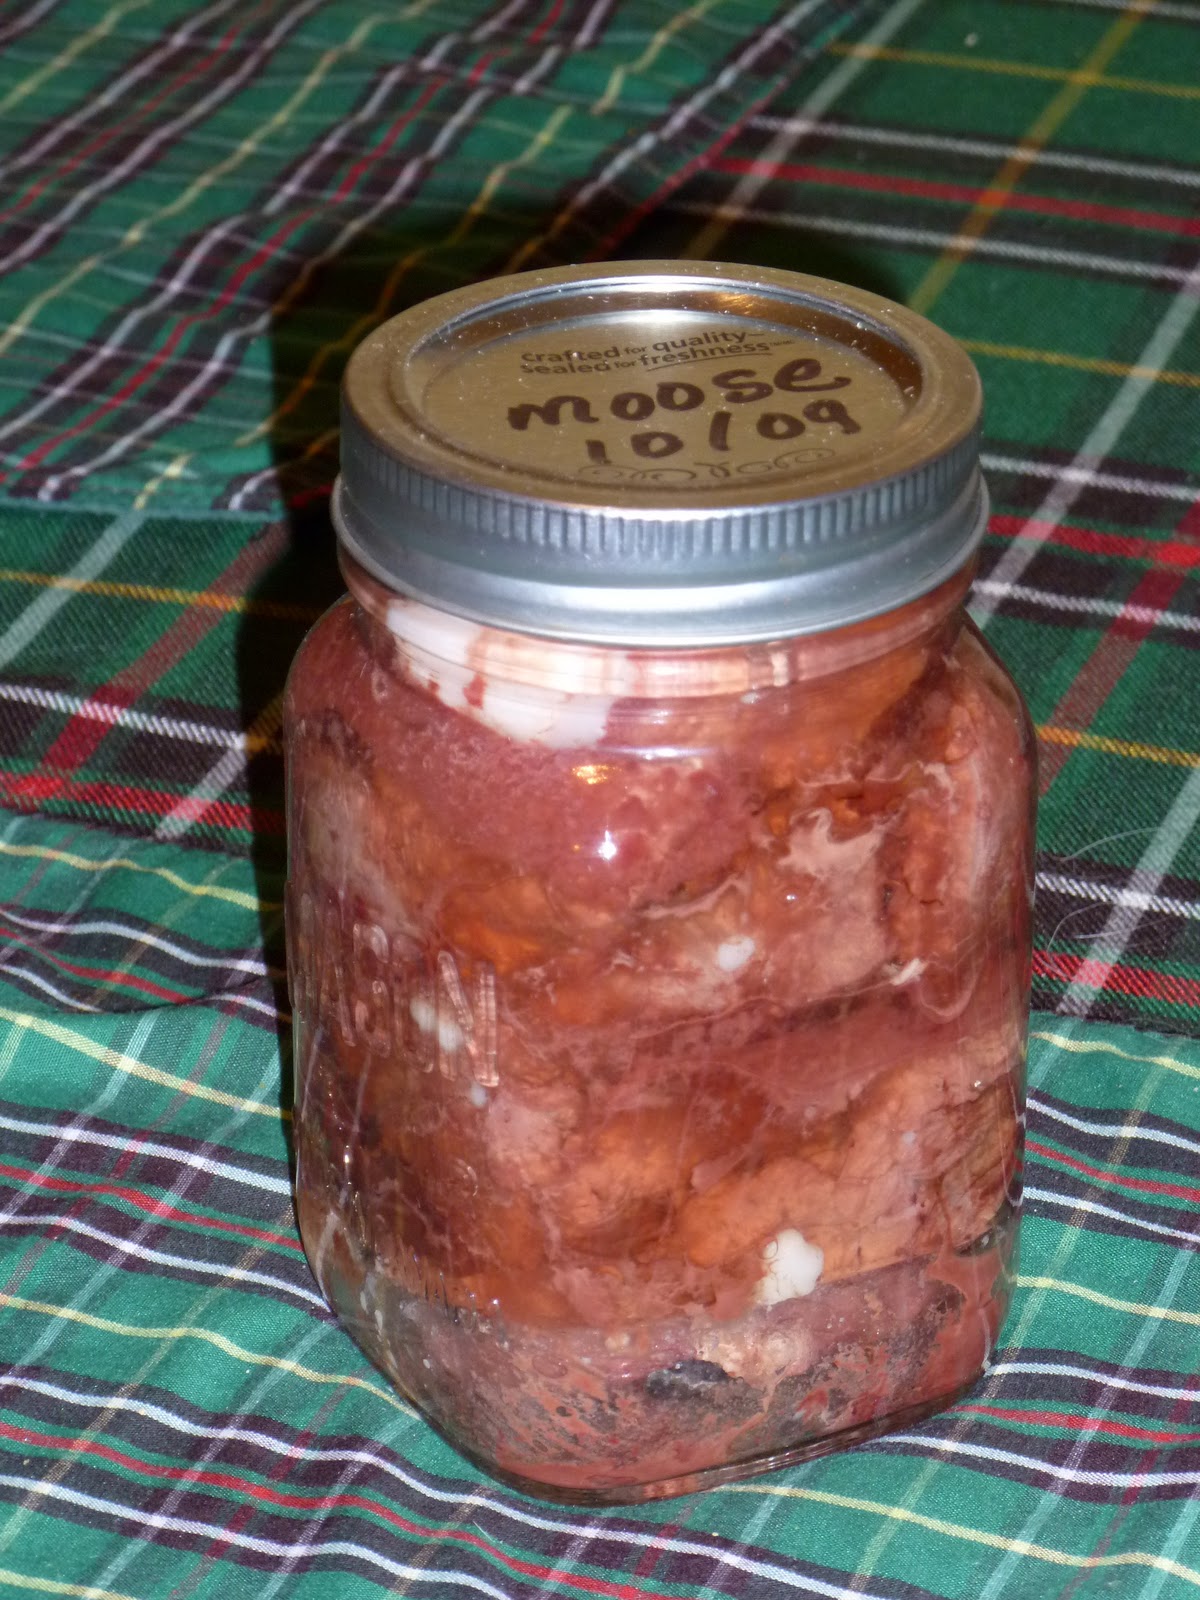
Bottled moose is a Newfoundland delicacy, and for an expatriate such as myself, is worth more to me than gold. For those who do not know what bottled moose is, it is technically "canned moose", but since it is typically can preserved in mason jars, we call it bottled moose. We also bottle rabbit and seal but that is another story.

 While different people have different methods and ingredient quantities, there are typically three key ingredients....cubed moose meat, a little onion, and a little fat back or salt pork. The concoction gets stuffed into mason jars, seasoned with some salt, and water canned for a long time. These days people seem to be starting to pressure can their bottled moose, which is a good thing since pressure canning is the only truly safe way to preserve meat.

Anyways, I mostly get my bottled moose from my Uncle Harold who is a seasoned pro at it. He lives in central Newfoundland, and I have always thought of central Newfoundland moose are the best tasting. When you are lucky enough to get it bottled, you simply can't beat it. The bottling processes makes even the toughest cut of meat incredibly tender, and the flavor is distinctly rich, savory, and just slightly gamy (in a good way). As many of you can attest to, bottled moose rules, and whether is up at the cabin, or having a boil up out on the pond in the middle of winter, nobody will ever screw their nose up to the stuff.

So, as I looked at my unopened box of bottled moose the other day I got to thinking what a nice feast it would make for my birthday supper. A real treat you know. Then, as my creative culinary juices began to flow I envisioned ways to mix it up, and began thinking about other red meat sandwiches. What came to mind was the classic French Dip, and behold, the birth of the Moosewich Dip! Here it is.

Ingredients (makes two 6 inch sandwiches):
- 1 Pint "bottled"  Moose
- 1 12" Ciabatta loaf or baguette, halved, and cut lengthwise
- mozzarella cheese, grated
- 1 medium yellow onion
- 1 TBSP chili sauce (or ketchup)
- cold bottle of your favorite beer

Directions:
Empty pint jar of bottled moose into a small sauce pan (aka dipper) and warm through over a light simmer for 10 minutes or so. Cut onion in thin slices and saute in a little oil over a medium high heat for 2-3 minutes. Reduce heat to medium and let onions brown and begin to carmalize for another 10-15 minutes. Season with a little salt and pepper. Meanwhile, cut a baguette or narrow ciabatta loaf in half so you have 2 6" pieces, and slice each in half lengthwise. Place a layer of grated cheese on each cut side of bread and melt in the oven or under the broiler. Once the moose meat has heated through, remove from the sauce pan and set aside, leaving the moose liquor, or au jus in the pan over the heat. To make a dipping sauce add the chili sauce or ketchup. Open your bottle of beer and a drop to the sauce. Arrange the moose meat on a piece of the bread, top with fried onions and add the second piece of cheesy bread. Serve warm with a side of savory and garlic roasted chips and dip the sandwich in the au jus as you go. It is awesome! Enjoy.

Thursday, November 4, 2010

Pasta E Fagioli

Today I have a cold, and having finished off the last of my yellow split pea and ham soup yesterday, I'm craving another bowl of something hot and comforting on this dreary day. What I wish I had is a bowl of pasta e fagioli, a rustic soup I made last week.

Pasta e fagioli is a traditional Italian "peasant" soup made with cheaply available pasta and beans, in addition to other Italian staples such as olive oil, garlic, onion, tomatoes and herbs. The traditional bean of choice is a cannellini (like a white kidney bean) and the pasta can be any small cut pasta. While Pasta e fagioli began as a meatless dish, today it often includes a little Italian meat such as prosciutto or panchetta. For this recipe, I started my pasta and bean soup off with two hot Italian sausages. I get my sausage these days from an awesome Italian Market in Albany, NY called Cardona's and they are incredible. If you ever visit New York's capitol region, Cardona's is well worth the visit as their deli creations are delicious (http://www.cardonasmarket.com/).

They beauty of this soup is that it only take about 30 minutes from start to finish, so it's a great weekday option, but it tastes like it has been simmering away all day. The soup gets great richness from the chicken stock and thickens from the starch from the pasta and by mushing some of the beans. Here's how I made mine.

Pasta E Fagioli

Ingredients:
2 links of hot Italian sausage, casing removed and rough chopped
1 yellow onion, diced
1 rib celery, sliced
1/2 red bell pepper, diced
3-4 cloves garlic, minced
8 artichoke quarters, from a can or jar, rough chop
8-10 sundried tomatoes packed in olive oil, chopped
1 32 ox box of good chicken stock
32 oz water
2 cans of cannellini beans
1/2 pound small bow-tie (or other small) pasta
1 tsp dried Italian seasoning
red pepper flakes (to taste)
salt and pepper
olive oil
Parmesan cheese
fresh parsley

Directions:

Over a medium heat, heat a little olive oil in a large heavy bottom pot. Add the chopped sausage and begin to brown the meat. In the meantime prep all of your veggies. Add the onion, celery and bell pepper and cook until softened. Add the garlic, artichoke, sundried tomatoes, herbs and chili flakes, and season with salt and pepper. Cook for a couple of minutes and add the box of chicken stock. Fill the empty box with water and add that to the pot. Bring the soup to a simmer and add the pasta and 1 can on the beans. Put the other can of beans in a bowl and with the back of a wooden spoon, smash some of the beans, and add to the pot. Stir occasionally and cook until the pasta is al dente, meaning it still has some bite. Add some fresh herbs such as parsley or chives and ladle into soup bowls. Top with freshly grated Parmesan cheese.

Bon appetite!

Friday, October 29, 2010

Roasted Beet Salad with Goat Cheese, Walnuts, Baby Greens aand Bold Vinaigrette

It seems to me like beets have become a trendy veggie over the last couple of years, with "Top Chef" and "Food Network Stars" showing off heirloom yellow beets and good old purple beets in a variety of tasty culinary creations. Newsflash...beets have always been popular in both Newfoundland and New England.The rest of North America is finally getting on the bandwagon of this super healthy and utterly delicious root vegetable.


While I ate a good many beets growing up, I only had them one way. They were purple and they were pickled. The in that was some people pickled their beets as slices, while some did so as more rustic chopped beet. Like salt, pepper, ketchup and mustard pickles, pickled beets are a standard condiment (side dish) on most Newfoundland supper tables. They go with just about anything. In fact, the only way I would eat my vegetables as a young child (potatoes excluded) was to mix my carrot and turnip in with my potatoes, pour in some beet juice and mash it all together into a uniform purple blob. Yes it sounds disgusting, but it was good. I guess I had an aversion to eating orange and yellow vegetables, but purple was no problem. For this recipe there will be no need to utilize beet juice as a cover up, although a purple vinaigrette sounds intriguing. The beets in the recipe are simply roasted in the oven with a little oil and lightly seasoned with a touch of salt. The flavor of roasted beets is incredibly rich, earthy, slightly sweet and slightly tart. Paired with baby greens tossed in a bold vinaigrette with tangy goat cheese, toasted walnuts and some crusty baguette slices and you have a winner winner purple salad dinner! Here is what you'll need and how I put it all together.

Vinaigrette:
Use a mason jar to shake up the ingredients and make an emulsification. To the jar add:

  • 1/2 cup extra virgin olive oil
  • 1/4 cup apple cider vinegar
  • juice of 1/2 a lemon
  • 1 heaping teaspoon of good mustard (I used Raye's horseradish maple mustard (http://www.rayesmustard.com/). If you use Dijon, I suggest adding a little prepared horseradish for some bold kick.
  • Fresh cracked pepper and a pinch of kosher or sea salt.

Give it a good shake. Use some to "dress" the salad greens just before plating and more to drizzle onto the plated salad.

Salad

Ingredients (6 servings)

  • Mix of baby greens, washed
  • 2 bunches of beets (about 6),
  • drizzle of extra virgin olive oil
  • fresh baguette, sliced on the bias and toasted
  • small package (8 ounce) of goat cheese
  • handful of whole walnuts, toasted lightly in a dry fry pan
  • Bold Vinaigrette (above)

Start preparing your beets as these take a little while to cook. Trim off the ends, keep the small ones whole and half the large beets so all are about the same size. Preheat oven to 350 and line a baking sheet with aluminum foil. Spread the beets on the pan and drizzle with a little olive oil, salt and pepper. Roast in the oven until tender, about 30 minutes. Remove when knife tender (pierced through easily with a sharp knife). Once cooked, remove the skin (if desired) and slice for the salad. For the nuts, place them in a dry fry pan and toast them over medium heat and toast for 1-2 minutes to bring out the natural oils. Be careful not to burn them.

Arrange dressed greens on a salad plate and place sliced beets and toasted nut on the greens. Put a big dollop of goat cheese on one end of the toasted baguette slice and crumble a few more pieces on the greens. Top with another drizzle of the vinaigrette.

Enjoy.

Chef's treat! I made some open face baguette, goat cheese and beet sandwiches to nibble on when I went back in the kitchen to serve up my second course of Roasted Squash and Apple Soup with caramelized shallots and Greek yogurt. I think these would make for a great party appetizer!

Wednesday, October 27, 2010

Dark and Stormy

Dubbed the official drink of Bermuda, a Dark & Stormy is a highball cocktail consisting of good quality dark rum and ginger beer (not to be confused with ginger ale as ginger beer has a much stronger ginger taste...ginger ale on steroids if you will), and sometimes served with a wedge of lime, and always served over ice.

 
What does Newfoundland have in common with Bermuda? No it isn't the tropical weather, it is dark rum. Besides the rum connection, a Dark & Stormy is also a great drink for Newfoundland as the name instantly gives me the impression of a dark and stormy coastline, with giant waves crashing against the rocks, and the faint beam of light from a lighthouse shining through the dense fog.

So, the next time you find yourself stuck inside on a dark and stormy night, or are just looking for a way to enjoy your favorite dark rum, try one of these. You'll be talking like a pirate in no time. Ahrrrrrrrrrr!

Dark & Stormy
Fill a tall highball glass halfway with ice cubes. Add 1 shot of good dark/black rum such as Screech, Myers or Goslings (2 if you so desire), top with ginger beer and garnish with a lime wedge. Down the hatch!

Monday, October 25, 2010

Fried Green Tomatoes and Quick Pickled Bell Pepper, Jalapeno and Cilantro Salad

Here in western New England we're smack dab in the middle of harvest time. Thanksgiving is about a month away, and we've been reaping the benefits of the great growing season with early fall apples, squash, pumpkins and other vegetables. Just last week I harvested the last of my "summer crop" which included the final picking of hot peppers, bell peppers, tomatillos and tomatoes. This year was a spectacular year for my tomatoes, which included a variety of large red tomatoes and super sweet cherry tomatoes, due to the seemingly extra hot weather we had. My reward at the end of the season was a nice basket of large unripened green tomatoes. While I'll probably make some kind of relish such as a Chow Chow, the first thing on my list for these green tomatoes was the southern classic "Fried  Green Tomatoes".

The Fried Green Tomatoes are simply breaded in a corm meal crust and pan fried in a little oil. To add some contrast to the dish and make it a more well rounded first course, I paired them with a quick pickled bell pepper and cilantro salad. Here's how I put it all together.

Fried Green Tomatoes

Ingredients:
2 medium/large green tomatoes, sliced (1/2 inch thick)
2 Cups flour
1 Cup Cornmeal
few shakes cayenne pepper
salt and pepper
1 egg
water
Canola or Peanut Oil for frying

Directions: Set up three bowls for an assembly line for dredging the tomato slices. Season each slice on both sides with salt and pepper. Add 1 cup of flour to bowl 1. In bowl 2 add the egg and beat well with a splash of water. In bowl three combine the corn meal, 1 cup of flour and season with cayenne, salt and pepper. Heat a large skillet over medium high heat and add enough oil to the pan to completely cover the bottom. While the oil is heating bread each tomato slice by coating in the flour, then into the egg wash and finally in the corn meal. Set aside on a wire rack until ready to fry. Cook the slices in the hot until until crisp and golden brown, flip and brown. Remove and season while hot with sea salt. Serve with pickled bell pepper salad.

Quick Pickled Pepper Salad

Ingredients:
1 Red Bell Pepper, sliced thin
1 Yellow Bell Pepper, sliced thin
1/2 red onion, sliced thin
1-2 jalepenos, sliced thin (remove seeds/membrane if desired)
hand full fresh cilantro
1/4 Cup Olive Oil
1/4 Cup Red Wine Vinegar
Salt and Pepper
Good Hot Sauce

Directions: Combine the sliced onion and peppers and cilantro sprigs in a mixing bowl. In a small bowl, whisk the oil into the vinegar to make an emulsification. Season with salt and pepper. Add the vinaigrette to the veggies, combine well, and set aside in the fridge for at least an hour to give the peppers and onions a quick pickling. Serve with a garnish of hot sauce droplets.
Blog Widget by LinkWithin