Wednesday, May 27, 2009
Pulled Pork Sandwiches...Satisfaction at its finest!
I really enjoy pork...the other white meat as they say. As Homer Simpson would say..."yes Lisa, a magical animal". Growing up in rural Newfoundland pork was an easy and inexpensive option for meals. In Newfoundland pork chops more often than not are the choice for barbecuing (grilling), ham is a staple, and pork roasts are a common meal. For me personally, I was fortunate to enjoy a "cooked dinner" every Sunday, which consisted of Jigs Dinner (salt meat, carrots, rutabaga, cabbage and potato, and usually a peas pudding) plus more meat, either a stuffed chicken, a pot roast, or a pork roast...each with a delicious gravy to smother the works in. While I'll talk more about all those other foods in future blogs, right now I want to focus on the pork roast.
The most common choice for a pork roast, is a bone-in butt roast (actually from the front end of the pig, not the ...well you know). This cut is a bit fatty, but with that you get awesome flavour. You also get a cut of meat that can be slow cooked (very hard to overcook) so it becomes fall off the bone tender and very juicy. With Jigs Dinner, the only way I ever had a pork roast was cooked for 3 hours at 350 with salt, pepper and onion. As it turns out, the pork roast is common in many cuisines, and one of the most popular is in southern US BBQ, and more specifically "pulled pork". While the most authentic pulled pork is cooked long and slow in a smoker, my recipe for the home cook is cooked long and slow in either a slow cooker or low oven. I add a homemade dry rub and serve it with a kicker of a sauce.
Basic Dry Rub
1/2 cup kosher Salt
1/4 brown sugar
1 Tbsp each of chili powder, paprika, garlic powder, onion powder
1 tsp each of black pepper, cayenne pepper, ancho chili powder, dry mustard
mix well, and store in an air tight jar
Eastern North Carolina BBQ Sauce
This BBQ sauce may be like no other BBQ sauce you've ever had. It's "watery" instead of "ketchupy" and is best applied just before each bite you take of the pork or the sandwich. This is my adaptation on a recipe a friend of mine gave me. His girlfriend is from South Carolina so it;s pretty authentic.
Fill a mason jar with
1 Cup apple cider vinegar
1 tsp salt
1/2 tsp cayenne pepper
1 tsp red pepper flakes (more if you like it hotter)
2 Tbsp brown sugar
1 Tbsp ketchup
1 Tbsp Hot Sauce (Frank's) or less of Tabasco
a couple shakes of Worcestershire Sauce
Shake well
Pulled Pork
Preheat oven to 300 or use a slow cooker
Use a 5-6 pound butt (bone in) pork roast, as you will want leftovers. This will feed a crowd.
Rub the entire roast with enough of the dry rub to completely cover.
Add seasoned roast, to a roasting pan, add a splash of water, apple juice or beer, and cover.
Cook for six hours, or at least until bone can be pulled free with no resistance.
Remove from oven and let rest, covered for 15 minutes.
Using two forks, shred the meat (I also encourage you to taste juicy morsels)
Select good roll for your sandwiches, and toast/broil them to add a little crunch.
Pile the rolls high with pork, add a little sauce, top with the roll. Keep some of the sweet/sour and hot BBQ sauce handy and spoon or squirt some before each bite. You will not be disappointed. I like to serve this with a good coleslaw and a glass of iced tea.
Enjoy.
Friday, May 22, 2009
PIZZA!
With the weekend almost here, I thought I'd write about a food I often save for the weekend, which also happens to be the food more than any other that hooked me on cooking at an early age....PIZZA! I love pizza, and really who doesn't...except my Dad for some weird reason because he usually eats anything, but he's not a pizza lover. Anyways, I love pizza of all flavors, and all styles, from deep dish to thin crust. Now that I live in New York State, I have access to some very fine pizza joints, and I've become a big fan of thin crusts. My favorite place though is "Joe's Cafe" in Northampton, MA, but I'll talk more Joe's another time.
As I said, I began making pizza at an early age. I don't remember when exactly but I'd guess that by 13 I had made a few Kraft " just add water" pizza mixes. Those were so great, with a yummy sauce and spice mixture included. It even came with parmesan cheese...well kinda. I don't know how many of those I cooked over the years, loaded with salami, pepperoni, bacon, hot dog wieners and cheese. I was a meat lover all the way. By grade 9 I had discovered homemade dough and from that point on I was making pizza, and later sauce too, from scratch. It's the only way to roll!
Here is my basic recipe for pizza dough. It is a yeast dough that generally makes two large pan pizzas, or 3 pies if I use my pizza stone. I have also added my basic pizza tomato sauce, which I use when making more traditional "red" pizzas...pepperoni, green pepper, mushroom, etc. I make a lot of "white" pizzas these days, without a tomato sauce, usually with some olive oil as a base. I'll be posting many of my classic and not so classic pizza recipes in the future. For now I'll give you a few pictures to tantalize your taste buds.
Basically just make a good dough and a good sauce, and add what you like. For me, the real key are the quality of the ingredients. Good pepperoni is a must. Until recently I used to have a problem finding the good stuff in St. John's (Newfoundland), but before I moved away, that was no longer a problem. Also, the vegetables must be fresh. For the cheese, I use mozzarella for many pies (skim is OK rater than whole...it actually melts better), and I like to grate fresh Parmesan or Romano around the crust before baking and also while eating. Other good condiments I like are chili pepper flakes and hot sauce.
Basic Pizza Dough
3 1/2 cups flour (I use 2 cups bread flour with 1 1/2 all-purpose)
1 1/4 cup of warm water (100 to 115 degrees Fahrenheit)
1 packet of yeast
1 tsp white sugar
2 Tbsp Olive Oil
1 tsp salt
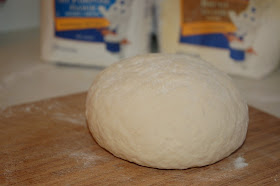
In a large bowl, add the warm water. Be careful to get the temperature right or the yeast will either not activate if it is too cold or be killed if it is too hot. I use my digital thermometer. Dissolve the sugar in the water and stir in the yeast. Let the mixture activate for about 10 minutes. Once the yeast has worked, add the salt and oil, and begin adding the flour gradually, mixing with a wooden spoon. I like to mix it into a well incorporated think batter, and then begin adding the flour more slowly. Near the end or the flour, its time to get your hands in there. On a clean counter, begin kneading the dough. This is a critical process, and it is important not to under knead. You may need to add flour to the board occasionally. I like to press the dough with the palms of my hands, fold it back on itself, and give it a quarter turn, and repeat. After kneading you will have built up the glutens in the bread...a key in good pizza dough. Form into a ball, and add a little olive oil to the bottom and sides of your bowl. Place the dough in the bowl, cover with a clean towel, and rest in a warm place to rise...about 1 hr, until well risen to the top of the bowl.
At this stage, I like to punch down the dough, cut it into however many pies I want to make (e.g. in half for two large pan pizzas). I next grease my pie pan with olive oil and begin stretching the dough. Once done, I cover again and let it rise a second time...for about 15-30 minutes. Then I restretch to the corners and its ready for toppings. If I am using my pizza stone, I let the second rise take place in seperate bowls, and hand toss the dough to make my pie.
Tomato Sauce for Pizza
2 Tbsp Olive Oil
1 small onion, minced
2 cloves garlic, minced
1 large can, quality plum tomatoes, crushed or puree
2 Tbsp tomato paste
2 Tbsp white sugar
1 Tbsp Dry Italian Herbs
Salt and Pepper
In a medium sauce pan, over medium heat, add:
the olive oile, onion and garlic, salt and pepper. Saute until softened, and add remaining ingredients. Simmer on a low heat for at least 30 minutes, preferably one hour. Adjust seasoning to taste (i.e. I like a somewhat sweet pizza sauce, others more savory or with some spice added for extra kick). That's it, and much better than any canned stuff.
Wednesday, May 20, 2009
Grilled Salmon and Vegetables
With spring in the air and warmer temperatures, it's nice get outside after a long day's work inside, and enjoy the fresh air. It's also a great time to cook and eat outdoors, and extend your time outside, instead of in the kitchen. I think too often we save the grill for weekend or just hamburgers and hot dogs, when in fact grilling provides many opportunities and benefits. It cuts down on dishes, it adds great texture and flavor, and it is especially apt to quick cooking times, a must for work week meals. As you will continue to learn about me as you follow this blog, I use my grill a lot, all year long...even through or long snowy winter in upstate New York, not unlike parts of Newfoundland. I use it for most every kind of protein...beef, pork, chicken, some fish and shellfish, and lots of veggies too.
Grilled Salmon with Asparagus and Eggplant
For the vegetables, the prep work is simple and can be done quickly.
For the asparagus, wash and trim the tough stalk end. I bend one to see where it breaks, if they are all about the same thickness, I line them up and cut off all the end at once, up to the break on the snap test. For thick spears, I peel the outer part with a vegetable peeler. The ends may be saved in a freezer bag and used in your next soup stock.
Bring a large enough pot of salted water to a boil, and partially cook (blanch) the asparagus for 5 minutes. remove blanched asparagus to a bowl of ice water to stop the cooking and help them retain a bright green colour. When you are ready to grill them, dry them with a towel and season with a little olive oil, salt and pepper.
For the eggplant, simply trim the ends, and slice into rounds, about a centimeter thick. before grilling, brush each side with olive oil and season with salt and pepper.
For the salmon, I suggest using a half pound per person. Leave the skin on (remove scales) and season portions with olive oil, salt and pepper. For this meal I added some lemon grill seasoning, but I often switch it up with one of my homemade spice rubs (e.g. Cajun, southwest, blackening, etc) or use some Old Bay Seasoning.
Preheat the grill on high for 5 minutes and give it a spray with cooking spray or wipe it down with an oiled paper towel. Add the salmon, skin side down, and cook for 4 minutes. As tempting as it may be, do not try and move the salmon, especially if it is stuck. It will release itself. After 4 minutes, flip and continue to cook for another 3-4 minutes, depending on the thickness. I usually allow for 8 minutes per inch, but it really depends on your taste. I like my salmon the moment the rawness leaves the flesh, while my wife likes a hint of raw flesh through the middle, and some like it more raw, or more cooked. What ever you do, do not cook it so much that it becomes dry. Remember, the fish will continue to cook internally once you remove it from the heat. If you are new to grilling (or broiling) salmon, this will take a little trial and error to get it down to a science, but that is one of the fun thing's about cooking...learning as you go. When you remove your fish, season it with a touch of salt and a squeeze of lemon.
While the salmon is cooking, you can also cook the vegetables, as they do not take long at all. Begin with the eggplant. Brush each side with the oil, season it, and lay over the hot grill. Cook until they have nice grill marks and flip. The asparagus will only take a few minutes since they have been blanched, so you can add them once you flip the salmon. Using tongs, mix the asparagus with the oil and lay on the grill. Be careful not to let them burn, and rotate them every so often.
Once the veggies are are cooked, I like to season them. For this meal I used freshly grated Parmesan cheese and smoked paprika. Served with a cold glass of beer (golden lager) or chardonnay, and this meal will impress your family/friends and satisfy your taste buds.
Monday, May 18, 2009
Chicken Soup
One of the most satisfying meals in my mind is a steaming bowl of homemade soup. It warms you up on a chilly evening and is a cure for what ails you. Good soup was part of my youth, with a mother and grandmother who made great, classic traditional Newfoundland soup recipes, namely chicken and rice, turkey vegetable, pea soup, and beef and barley. I don't know how many times I saw Mom standing over the pot with a paring knife and an onion, slicing off small pieces and using her thumb like a cutting board. While not a technique I would use, I've seen many other Newfoundland "moms" using the same method. With results that were so good, who am I to complain.
This past weekend my wife and I spent the weekend camping and hiking in New York's Adirondack Park. We had a good time with friends living in Ottawa (one from Newfoundland, and even the camp site was owed by two Newfoundlander's...go figure), but by the end of yesterday on the drive home my mind was racing on what I wanted to cook and eat for supper. After two days of having a few glasses of rum, eating potato chips and hot dogs, all while battling a cold, I really needed something nourishing and satisfying. Soup was the answer.
Following the wisdom of James Barber (The Urban Peasant), I used what I had available in my fridge and pantry, kept it simple, and easy! I has 3 bone in chicken breasts in my freezer, staples of onion, celery and carrot in my fridge, and medium shells (pasta) in the cupboard, so with a few other ingredients, my quick chicken soup was made. Here is my recipe, but feel free to use what you have for substitutions.
Chicken Soup
Cook in a large Dutch Oven, over high heat, 3 bone-in chicken breasts with enough water to cover (water should be about 2 inches from the top). Chop and add one small onion, 3-4 leafy parts of celery ribs, one carrot, plus 1 bay leaf, 1 tsp of salt and a few grinds of black pepper, and 1 tsp of summer savory. Once the lot comes to a boil, reduce heat to a simmer. Cover and cook for 45 minutes.
Remove chicken and allow to cool until they can be handled with bare hands. With a slotted spoon, remove vegetables from the stock.
To the cleared stock, add:
- 1 medium onion, minced
- 3 ribs celery, halved lengthwise and sliced thin
- 3 carrots, quartered and slice thin
- 1 small turnip, diced fine
- 1 large potato, diced fine
Simmer for 15 minutes.
In meantime, remove skin and bones from chicken and dice or shred with hands into large chunks/pieces. Once veggies have cooked for 15 minutes, add chicken and add 1/3 pound of medium sized pasta shells. Cook for an additional 8-9 minutes, until pasta is al dente. Be sure not to overcook the pasta. Add a bunch of chopped flat leaf parsley for colour and to brightnen up the flavour. Taste, and adjust seasoning by adding salt and pepper.
For me and my wife, this soup was just what we needed after a long weekend. It was savory, rich, flavourful, and extremely satisfying...everything a good bowl of soup should be. It was so good I just had another two bowls for supper tonight! Enjoy!
Wednesday, May 13, 2009
Mary Brown's and Oven Fried Chicken
I haven't met a lot of people who don't enjoy a good piece of fried chicken. There's something extremely satisfying to biting into a hot, crispy yet juicy, well seasoned piece of golden poultry goodness. All around Newfoundland take-out restaurants offer their own version of this southern American classic meal. Just where I grew up in Trinity Bay South, we had lots of fried chicken choices....Mudders, Violet's, Pitcher's and Taylor's all in a line as you drove down the shore. There was nothing better than a feed of Violet's on a Saturday night on the way home from the bars.
Another fried chicken joint that can be found throughout Newfoundland is Mary Brown's, Famous Fried Chicken and Taters (http://www.marybrowns.com/). While not solely a Newfoundland chain, Mary Brown's restaurants are all over The Rock, with others in sections of mainland Canada full of expatriated Newfoundlanders. For any of you reading who have never tried Mary Brown's, if you ever have the opportunity I encourage you to do so. I started eating this wonderfully marinated and seasoned chicken at a very early age, throughout my childhood (see insert of me enjoying some Mary Brown's on the old Newfoundland Railway train out of Whitborne) and teens at every hockey tournament, through late night college "study sessions", and most recently on a trip to the west coast and northern peninsula last September.
As a way to bring that fried chicken taste and satisfaction to my table at home...without the guilt of all the calories and fat, I developed this oven "fried" chicken recipe. I tested it out just this past weekend for a Mother's Day feast for my mother-in-law and in-laws and it was a big hit. Not that I'm biased or anything, but it was some of the finest chicken I ever ate! The marinade and seasoning had penetrated right through the meat, and the crust was crunchy. I used skinless, legs and thighs, but you can use a whole cut up chicken just a s well. I hope it works out as well for you as it did for me.
Oven "Fried" Chicken
In a large bowl, add one chicken, cut into 2 legs, 2 thighs, 2 breasts and 2 wings (or 4 lbs of one kind of chicken parts), skin removed.
- add enough buttermilk to cover chicken
- 1 tsp of each of the following: cayenne pepper, black pepper, salt, ground thyme, chili powder, garlic powder, onion powder, paprika
Mix everything well with your hands, cover with plastic and refrigerate for 6-8 hours.
Preheat oven to 350 degrees
Add 2 Tbsp of vegetable oil to a large baking sheet
In a large bowl, or better yet a double lined paper bag, add
- 2 cups all-purpose flour
- 1 cup panko (or other dry) breadcrumbs
One at a time, drop wet chicken pieces into bag of flour and shake. Lay chicken on oiled sheet pan. Continue until all the chicken pieces are coated. Place in oven and bake for about 45 minutes. Increase oven temperature to 425, and baste top of chicken with rendered fat in the pan, in order to moisten the flour if it is dry. Return to oven for 15 minutes, and turn on the broiler for the final few minutes to crisp the top. Turn off oven and let chicken rest in warm oven for 15 minutes. Sprinkle with kosher salt and enjoy. All you'll be missing are the taters and the gravy. Oh how i miss Mary Brown's gravy!
I paired my meal with a red potato salad with apple, green onion and hard-boiled egg, and a strawberry-spinach salad.
Monday, May 11, 2009
Mussels and Fries
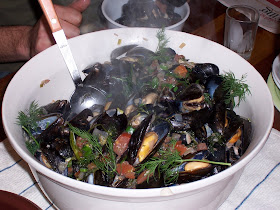
One of my favorite first course dishes to serve are mussels. I like to prepare them a few slightly different ways, which almost always include alcohol and a rich and savory broth. When served with some grilled crusty bread, a light salad and some homemade oven baked fries and you have a real winner of a meal.
Growing up in outport Newfoundland a common summer time activity was to harvest mussels amongst the slippery kelp covered rocks at low tide. A boil up on the beach with the mussels cooked in nothing more than the sea water from where they grew, was a meal that couldn't be beat, as I'm sure many of you can attest to.
Now a days, with a successful aquaculture industry in Newfoundland, getting great, fresh mussels is a luxury we can enjoy year round. Even here in New York and western Massachusetts I can get mussels anytime. They are always a product of either Maine of PEI (I wish they were Newfoundland raised) and cost a bit more than they do at home ($1.99/lb), they are always worth it.
This recipe below utilizes my beer of the month, Geary's Summer Ale (http://www.gearybrewing.com/), as the steaming liquid. The ale adds a spicy hoppiness that pairs perfectly with the other flavors of the dish. For the mussels I'd suggest 1 1/2 lbs per person for a main course. The following recipe is for 4 people and uses 6 lbs of mussels.
Steamed Mussels and Beer
Fill sink with cold water and add mussels. Scrub and remove beards if necessary. All mussels that float are good. Any that do not close when lightly tapped on the side of the sink are dead. Discard any with cracks or that do not close.
Heat a large stock pot over medium-high heat and add
1 Tbsp Olive Oil
1 Tbsp butter
Add:
1 medium yellow onion, minced
2-3 cloves of garlic, minced
saute until onion is translucent, but not browned
add 1 tomato, diced fine
Pour in one bottle of your favorite beer (minus one good swig for the chef), a few cranks of freshly ground pepper and a pinch of kosher salt. Add the mussels and cover the pot.
Mussels should cook in5-8 minutes. Pour out into a large bowl, or divide into 4 individual bowls. Sprinkle with freshly chopped dill weed, green onion and lemon wedges. Served with a warm/grilled piece of crusty bread (I like sourdough) to be used to soak up the broth.
For the fries, which are an excellent accompaniment for the mussels.
Preheat oven to 425 degrees.
Scrub 4-6 large russet/Yukon gold potatoes
Slice each spud in half, cut halves into 1/2 inch pieces lengthwise, and stack and cut pieces into french fries. Whatever size you want is fine, just remember that cooking time will be longer for thicker, steak cut fries, and quickest for shoe string fries. In a large bowl, rinse fries with water, drain and dry well in a kitchen towel. Add 4 Tbsp of olive oil, and a 1/2 tsp of black pepper and toss well. I usually save the kosher salt until the fries are cooked. However I often make seasoned fries and now is the time to add that, whether it be chili powder, seasoned salt, herbs and garlic, Mrs. Dash etc.
Spread fries out evenly on a large baking sheet. Once browned turn (usually 20-25 minutes) and continue to cook for 10 minutes. Season and enjoy. These taste like they were deep fried without the guilt.
Saturday, May 9, 2009
Duck Fat and Poutine
Since I've been living in the US, I've been able to do quite a bit of traveling throughout the northeast to all corners of New England, as well as New York, New Jersey and Pennsylvania. Along the way I've been in many neat towns and cities and before I embark on my roadtrips, I always do a little "research" on what I may except in terms of culinary treats. Along the way I've found some great spots, many in unexpected places, in cities such as Concord, New Hampshire, Newport, Rhode Island and Burlington, Vermont. My best find so far though was in Portland, Maine, at a place called Duck Fat.
I like Maine, as it's as close to Newfoundland as you can get in this neck of the woods; and I really like Portland. Even though I've only been there briefly a couple of times, it reminds me so much of St. John's. While there aren't rows of jelly bean colored houses it is a hilly port town, with a quaint downtown full of trendy shops, restaurants and galleries, etc. I would urge anyone to go there, and I hope to return for a weekend later in the summer to do some exploring and also to get me some more of Duck Fat.
For my last trip to Portland I was on a mission to go Duck Fat to sample their poutine, which they describe as "Layers of Our Duckfat Belgian Fries topped with 'Silvery Moon Creamery' Cheese Curd & Homemade Duck Gravy". Yeah I know, it was a good as it sounds. The portion was spot on and the taste was incredible. The hand cut fries were tender and crisp with a hint of extra flavor from being fried in the duck fat/vegetable oil blend, the gravy was rich and salty with incredible depth, and the cheese curds were just what they should be; chewy, tangy, squeeky and stretchy. It was heaven in a bowl. I savored every bite, sucking the insides of my cheeks, as I washed it down with a Geary's Ale. I also ordered the meatloaf panini but it was overkill as the poutine did an admirable job of filling my belly. It was one of the most enjoyable, no good for you meals I'd ever had.
Being the Poutine connoisseur that I am, I gave it a perfect score of 40 points (10 points each for the fries, gravy and cheese, and 10 more for overall taste).
Here is the link to Duckfat
http://www.duckfat.com/
Check it out and see their menu. If you're ever in the Portland you have to go there!
http://www.portlandmaine.com/
Wednesday, May 6, 2009
Fish and Chips
People are often asked what they would choose as their "last supper". For me, without a doubt it would be fish and chips. Fresh cod, lightly battered, with hand cut french fries, seasoned with sea salt, with a side of dressing and gravy, fresh lemon and good brown malt vinegar. I'd wash it all down with a cold bottle of Blue Star or India (or maybe a can of Pineapple Crush).
Living in St. John's, Newfoundland allows one to take many things for granted, and good fish-n-chips is no exception. You can get really good fresh fish and a load of fries, with all the fixins (fried onions with canned peas, dressing and gravy) all around town, even in the mall, and especially downtown on Freshwater Road.
Since I've moved away, I've yet to have great fish and chips, the way we do it back home with an "English style" wet batter that is light( not doughy) and crisp, with well cooked (twice fried is the only way to go) homemade french fries. I've had good fish, as there are "Fish Fry's" as they call them here all over the place, but they are not even close. For starters, finding homemade fries is impossible. Everyone uses frozen fries, and crinkle cut seem to be the most popular at the "Fish Fry" places I've been to (small portion too!). Then there is the fish and the batter. The fish is almost always haddock, which I like, but it isn't cod. Also is the batter. More often than not, here in upstate NY, the batter is a dry flour based batter...like a plain fried chicken crust. In New England, particularly on the coast they do a simple corn flour batter. The seafood (which I must say is often quite fresh (haddock, flounder, scallops, shrimp and clams) is simply dunked in milk and tossed in the corn flour and fried. I like this, especially on the shellfish, but again, it just isn't the same. Plus if you think you're going to find dressing and gravy served with your fish you're mistaken. Here the side is coleslaw, tarter sauce, and a malt vinegar, but the vinegar is not like we have back in Newfoundland (the stuff made from Brown Vinegar Concentrate you get at Ches' for instance).
With all that being said it is needless to say that I try and make fish and chips myself at home two or three times a month. Since I don't have a deep fat fryer, I do a pan fried cod served with oven roasted home fries, and yes I always have the dressing and gravy and a fresh tarter sauce with vinegar. Check it out!
Cut:
4 large potatoes (whatever you like, I mix it up between Yukons, Russets and Reds) into french fries, rinse with water and dry in towels
Add:
2 Tbsp Olive Oil
Roast at 425 on baking sheet for 30-35 minutes (turn after20 minutes)
While fries are cooking, prepare:
1 1/2 pounds of cod, cut into 6 pieces
And one bowl for each of the following:
1 cup of flour
1 egg + splash of water
1 cup flour = 1 cup fine bread crumb (seasoned with kosher salt, black pepper, dried savory)
Heat 1/4 cup of vegetable oil in a large non-stick skillet over a medium high heat.
In assembly line fashion, dredge fish in flour, eggwash and seasoned flour/crumb mixture.
Add breaded fish one piece at a time to the hot oil, being careful not to splash your fingers.
Cook until golden brown and flip.
For a quick tarter sauce, combine
1 cup mayo
1 Tbsp lemon juice
4-5 capers, minced
1 tsp sweet green relish
a few shakes of malt vinegar
black pepper
Once fish and fries are done, season immediately with kosher salt and freshly ground black pepper. Squeeze the fish with lemon before serving.